Nanoforge xtbl editing
 |
Tutorial: Nanoforge xtbl editing Prepared by Moneyl. |
Introduction
This tutorial shows how to edit xtbl files for RFG using Nanoforge. Xtbls are xml files used for configure the game. Many things in game such as vehicle and NPC stats are configured via xtbls. There are nearly 500 of them to edit. You can download the latest release on github. See Nanoforge basics for an intro to some of its other features.
Create a project
The first step of using Nanoforge is to create a project. A project tracks the changes made for a mod. You should create a different project for each mod. To do so, open Nanoforge and click the New project button. When you do you'll see the following popup.
- Name: The name of your mod. This is the name that your mod will show in the mod manager.
- Path: The folder path where you want to save your project files. I created a folder on my desktop called
Nanoforge Projectsfor this purpose for easy access. - Description: The description of your mod that's shown in the mod manager.
- Author: Your username, shown in the mod manager.
Finding xtbls
Most .xtbl files are in misc.vpp_pc. Table.vpp_pc has duplicates of the xtbls in misc.vpp_pc, but you shouldn't edit those as the mod manager disables table.vpp_pc. To see all xtbl files type *.xtbl
in the Nanoforge file explorer search bar. To open an xtbl file double click it in the file explorer.
Editing xtbls
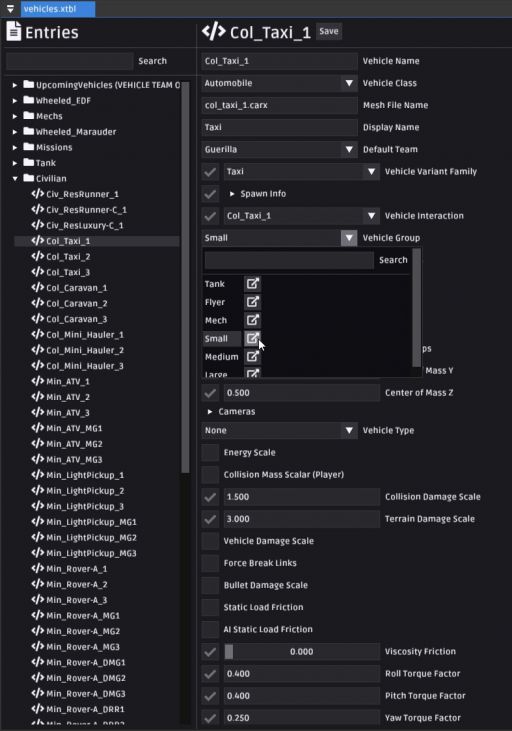
Once you open an xtbl you should see something like this. Xtbls consist of one or many entries which can be organized into categories. In the image below you can see vehicles.xtbl. The left side lists all the entries and the right side lists all the values of the selected entry.
Things to note:
- If you mouse over some values you'll see a tooltip describing what the value does. This feature relies on descriptions added to xtbls by the developers so many values don't have no description or very vague ones.
- Some values like
Vehicle groupin the image reference entries in other xtbls. You can click the button next to the entries name to jump to that xtbl in a new tab.
Packaging your mod
The final step of editing xtbls is to package your mod. Packaging generates a modinfo.xml file for the mod manager and updates any game files that were changed with your texture edits. To package your mod use File > Package mod on the main menu bar. Once packaging is done you can use your mod. To get the output go to the project folder you chose earlier and look inside it's Output folder. This should have a mod manager mod ready for use. Copy the files to a new folder in your mods folder and it should be visible in the mod manager and ready to go.

